The BadgeOS Transfer Points Add-on allows your website’s users to exchange BadgeOS points. With this add-on, any user can send points to or receive points from any other user on the site, with support for all point types.
Table Of Contents
- Install BadgeOS Transfer Points
- Configure BadgeOS Transfer Points Settings
- Use the BadgeOS Transfer Points Shortcodes
- Configure BadgeOS Transfer Points Email Notifications
- Frequently Asked Questions
1. Install BadgeOS Transfer Points
- Install and activate the BadgeOS plugin.
- Install and activate the BadgeOS Transfer Points add-on.
- After activating the add-on, you will see a new tab labeled ‘Transfer Points’ added on the BadgeOS Settings page.
2. Configure BadgeOS Transfer Points Settings
All of the add-on settings are configured from the Transfer Points tab on the BadgeOS settings page.
- Allowed User Role(s):
From this field, you can select the user roles that are able to transfer points on the sites. Only the allowed user roles will be displayed on the transfer points form. To enable the option for all users, select “All”.
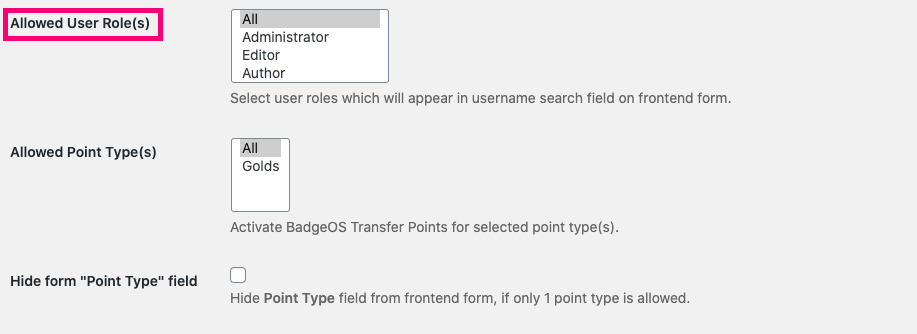
- Allowed Point Type(s):
From this field, you can select the specific point types that can be transferred between users. Only the allowed point types will be displayed on the transfer points form. To allow transfers for all point types, select “All”.

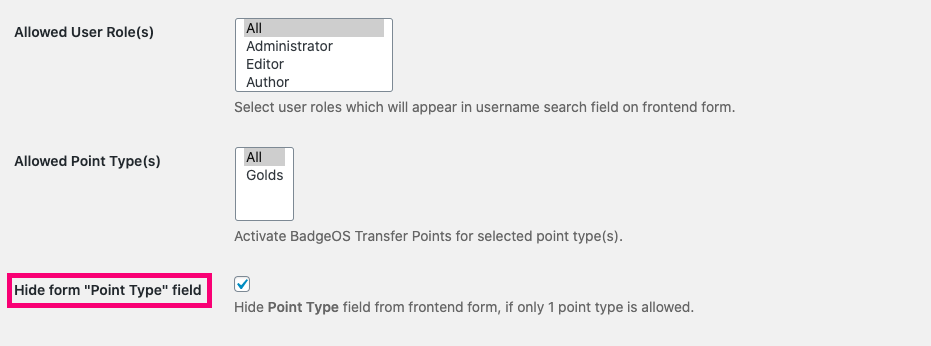
- Hide form Point Type field:
If you have configured the add-on so that only one point type can be transferred, enable this option to hide the point type field, containing point type options, from the transfer points form.
- The minimum amount of points required:
In this field, you can set a requirement for a minimum amount of points that a user must have in order to be able to transfer points. For example, if this field is set to 100, users won’t be able to transfer points to other users unless they have 100 points. Setting this field to 0 will enable users to transfer points without having to meet any point requirement.

- The minimum amount of points:
In this field, you can set the minimum amount of points that can be transferred. Users won’t be able to complete a transfer for a lower amount of points than the number set here. For example, if this field is set to 10, users won’t be able to transfer less than 10 per single transfer. This value is set to 1 by default and should never be less than 1.

- The maximum amount of points:
From this field you can set a limit on the number of points, per point type, that can be transferred. Users won’t be able to transfer a number of points that exceed the maximum amount of points set in this field. Setting this value to “0” allows users to transfer an unlimited amount of points.
For example, if the maximum amount of points is set to 30 and a user tries to transfer 20 points and then 10 points, both transfers would be successful. When the user then tries to transfer ten more points, the transfer won’t succeed because the maximum number of points limit has been exceeded. The limit is applied per point type, which means that in this case, with the limit set to 30, users can transfer 30 points of each point type.

- The maximum amount of points per user:
Using this field, you can set a limit on the maximum number of points that can be transferred per single user. Users won’t be able to transfer a number of points to a single user if the number exceeds the amount set in this field. The maximum amount of points allowed are considered per individual point type.
For example, if the inserted amount is 20 in this field and a user transfers 20 points to “John Doe”, the user won’t be able to transfer any more points of the same point type to “John Doe”. However, point transfers (less than or equal to 20) of other point types to the same “John Doe” user will be allowed.
If set to 0, users will be able to transfer an unlimited amount of points to any other user.

- The maximum amount of points for a period:
In this field, you can set a limit on the number of points a user can transfer during a set period of time. Setting this field to 0 allows the user to transfer an unlimited number of points. You can customize the length of the period of time by selecting the number of minutes, hours, days, weeks, months, or years.
For example, If this field is set to a maximum of 10 points per 1 day, then a user won’t be able to transfer more than 10 points in a single day.

- Maximum time transfer:
From this field, you can set a limit on the total amount of times that users can transfer points. For example, if this field is set to “5,” then the user will only be able to transfer points 5 times. Setting this value to “0” allows users to transfer points an unlimited number of times.

- Maximum time transfer for user roles:
You can use this field to set a limit on the number of times a user can transfer points to a specific user role. User roles can be selected from the field to the right. For example, if the Maximum Time Transfer For User Roles field is set to “3,” then users will only be able to transfer points to the selected user roles a total of 3 times. When set to 0, the user will be able to transfer points to the selected user roles an unlimited amount of times.

- Maximum time transfer per user:
From this field, you can set a limit on the number of times users are able to transfer points to every single user. For example, if this field is set to “5,” then users can only transfer points to the same user for a total of 5 times. If the field’s value is set to 0, users will be able to transfer points to the same user an unlimited number of times.

- Maximum time transfer for a period:
This field allows you to set a limit on the number of times users can transfer points during a selected period of time. For example, you can set this field to 1 transfer for a one day period, preventing users from transferring points more than once per day. When set to 0, users will be able to transfer points an unlimited amount of times during the selected period of time.

3. Use the BadgeOS Transfer Points Shortcode
Users are able to complete point transfers by using a Transfer Points form. You can easily display the form on any page by using the BadgeOS Transfer Points form shortcode.
If you are using a Classic editor, you can add the BadgeOS Transfer Points form shortcode directly from the Add BadgeOS Shortcode button.
If you are using the Gutenberg editor, you can manually add this shortcode: [badgeos_transfer_points_form].
This is how the BadgeOS Transfer Points Form shortcode will be displayed on the front-end.

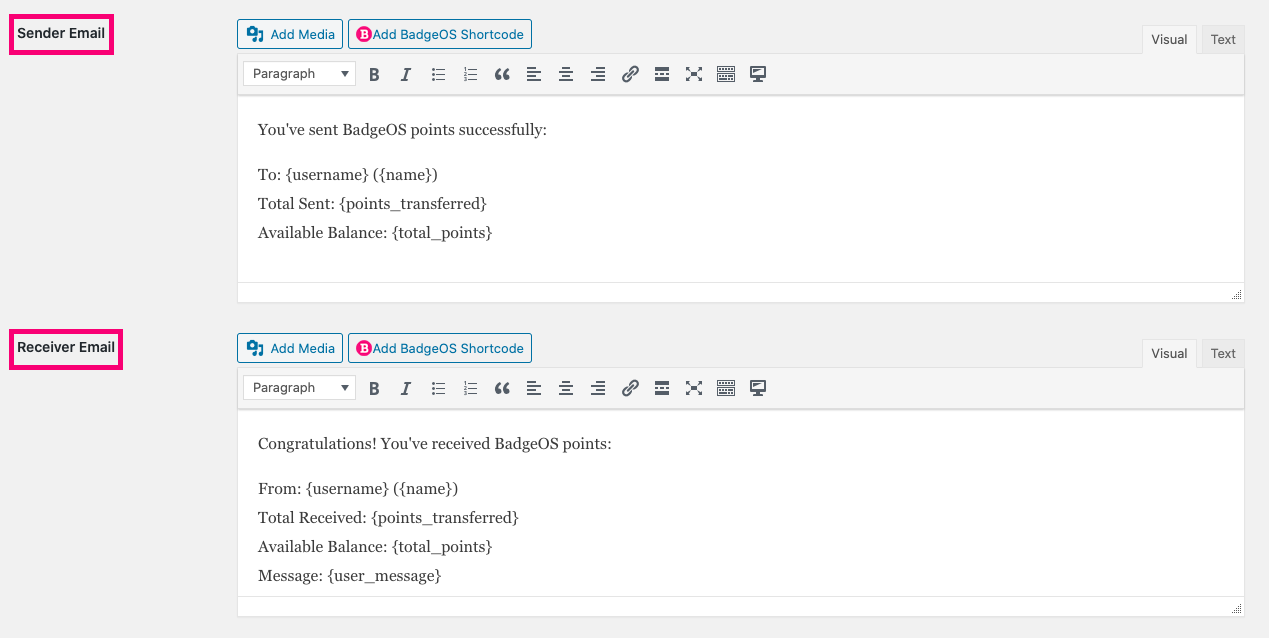
4. Configure Email Notifications For The BadgeOS Transfer Points Add-on
Both users involved in a points transaction, the sender, and the receiver, will receive an email notification. You can customize the message sent in the email body from BadgeOS > Transfer Points > Email Templates.
5. Frequently Asked Questions
- Does the Transfer Points Add-on support several point types?
Yes, all BadgeOS points types are supported. Users can transfer points of any point type.
- Can I enable point transfers for specific user roles only?
Yes, you can select any specific user role so that only users from the selected user roles will be listed in the Transfer Points Form.
- How is the “Transfer Points” Form displayed on the frontend?
To display the form, create a page and insert the BadgeOS Transfer Points Form shortcode in it. From this form, users can transfer points.
- Can we award achievements based on points transfers?
Currently, there is no trigger that allows you to award a badge or achievement to users when they transfer points.