With the Submission and Nomination Add-on users can earn achievements through admin reviewed submissions and nominations. Website administrators can manage, approve or reject submissions and nominations through a simple process. Submissions can also be automatically accepted. In this article, you’ll learn how to install, configure, and use submissions and nominations.
Table Of Contents
- Install The Submission And Nomination Add-on
- Configure General Settings
- Emails
- Create An Achievement For Submission
- Display Submission Forms And Lists
- Review Submissions
- Create An Achievement For Nomination
- Display Nomination Forms And Lists
- Review Nominations
- Frequently Asked Questions
1. Install The Submission And Nomination Add-on
- Install the BadgeOS plugin & activate it.
- Install the BadgeOS Nomination/Submission add-on and activate it.
- Navigate to BadgeOS > Settings, and there will be a tab on the left menu on the General section.

- Two new sub-menu entries of “Submission Reviews” and “Nomination Reviews” are also added under the BadgeOS menu.
2. Configure General Settings
To configure the general add-on settings go to the. You can configure the following Submission and Nomination settings:
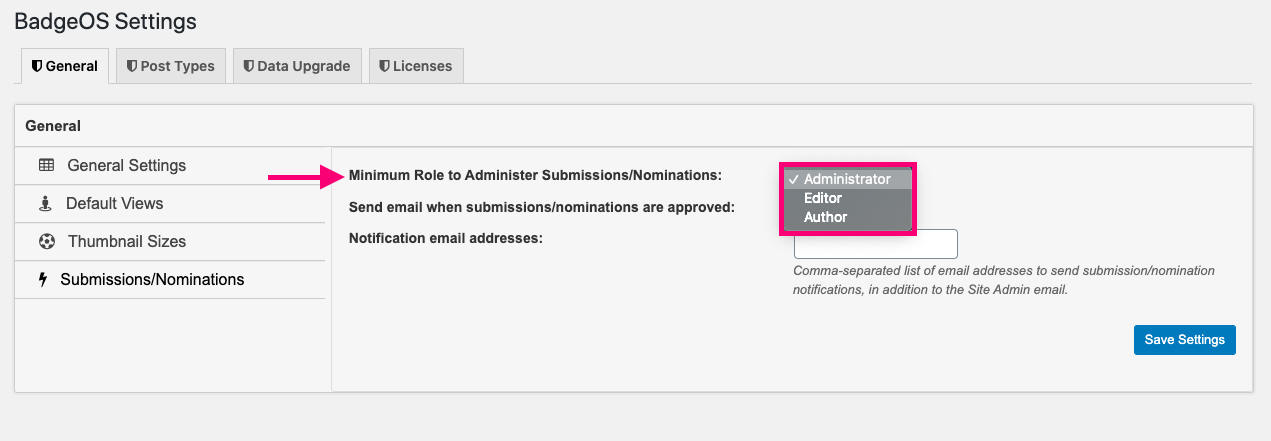
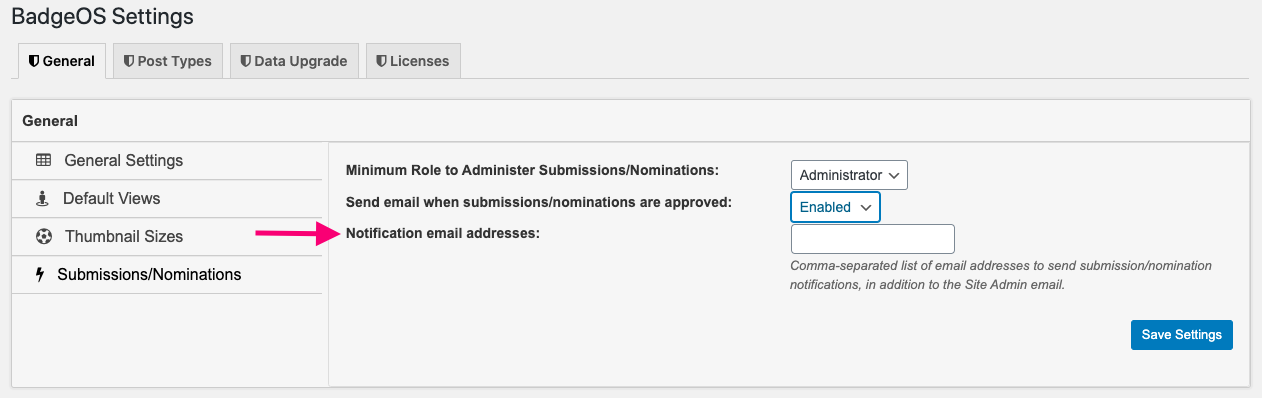
- Minimum Role to Administer:
This dropdown menu allows the admin to select what type of user role can access and use this plugin. If you want any teacher or Instructor to be able to import and export quizzes, you should select their respective role.
- Send email when submissions/nominations are received:
Check this option if you want to send emails when submissions and nominations are received. Make sure the “Email Preference” option is enabled from the user profile page.

- Notification email addresses:
Enter the emails or emails separated by commas on which you want to send notifications for submissions and nominations.
3. Emails
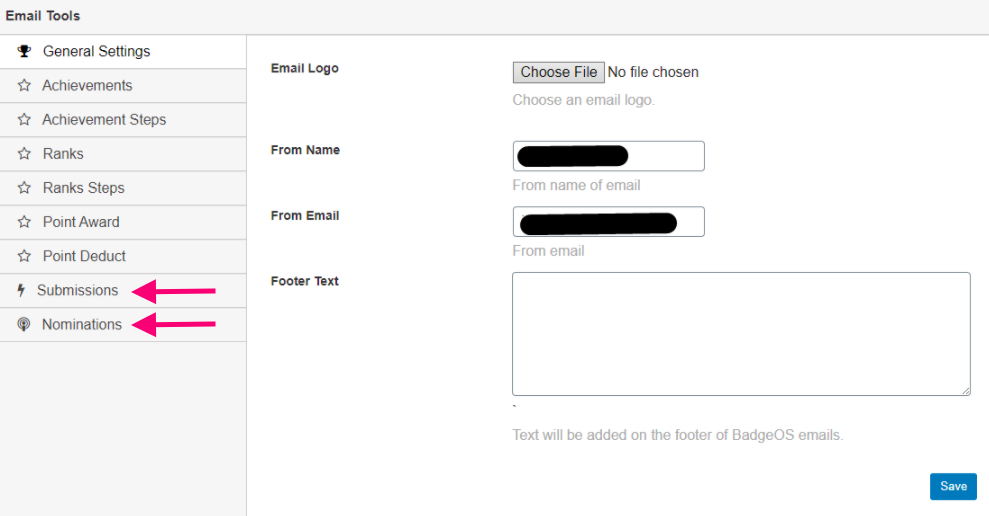
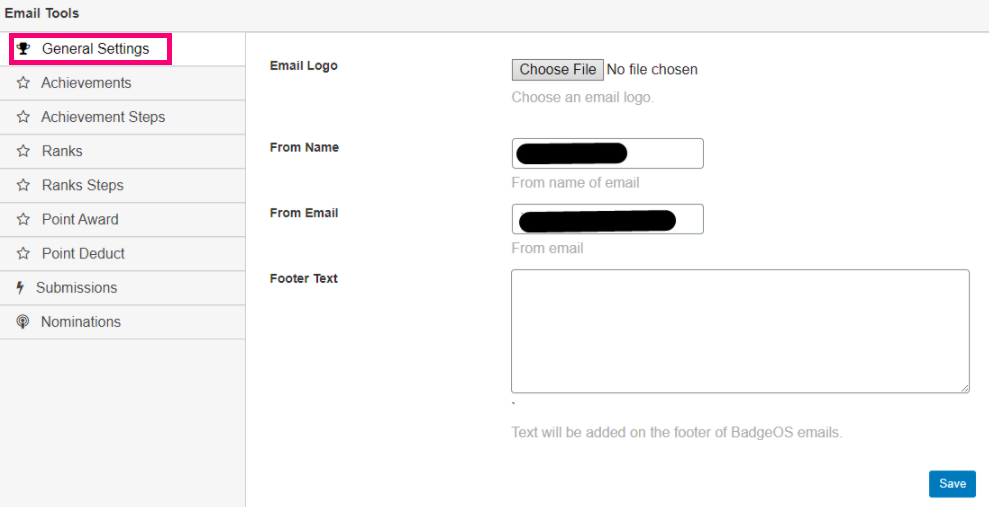
Navigate to BadgeOS > Tools > Emails. You will be able to see the “Submissions” and “Nominations” tabs on the email’s page.
First, configure the following general email options:
- Email Logo: You can choose an email logo by using this option. Click “Choose file.” Select the logo.
- From Name: Enter the email sender name here.
- From Email: Enter the sender email address here.
- Footer Text: You can add the custom footer text in this option.
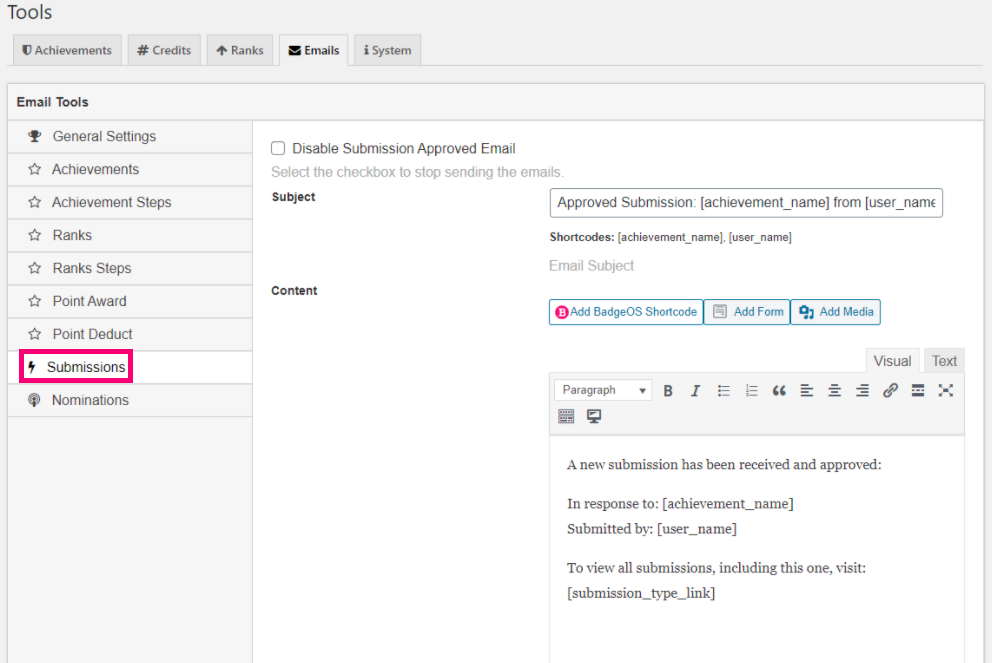
Submissions
Next, go to the Submissions tab. Here you can configure the email settings for approved, rejected, and pending submissions. These are the settings you can configure for approved submissions:
- Disable Submission Approved Email: Check this option if you want to disable submission approved email.
- Subject: Enter the email subject here. You can use the shortcodes [achievement_name] and [user_name] to add the achievement name and user name in the email subject, respectively.
- Content: Enter the email content here. You can use the shortcodes [achievement_name], [user_name], [submission_type_link], and [achievement_link] to add the achievement name, user name, links of all submission achievements, and achievement link in the email respectively.
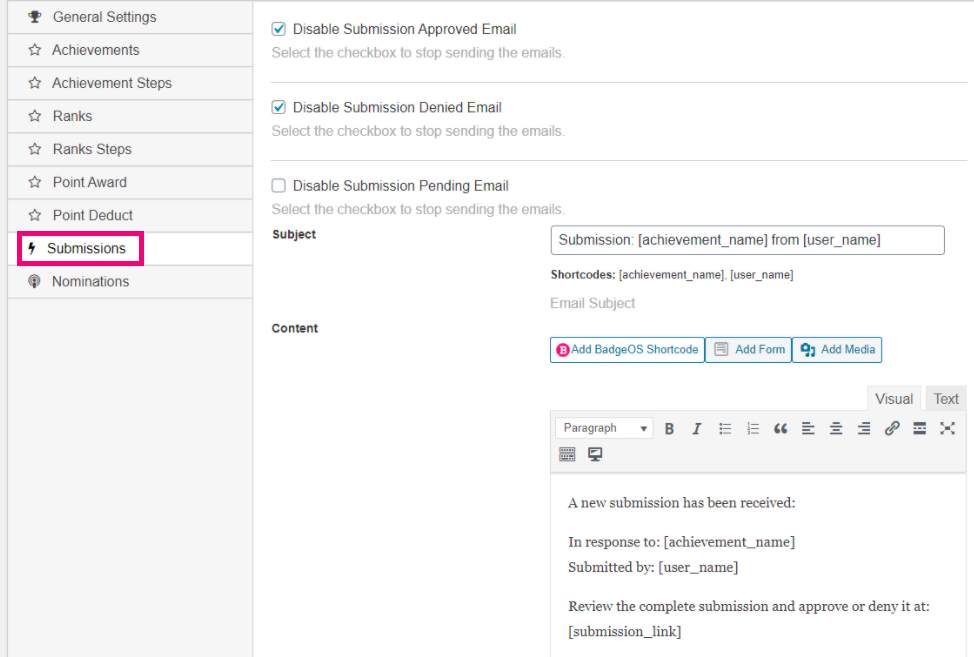
Next in the Submissions tab, you can configure the following settings for rejected submissions:
- Disable Submission Denied Email: Check this option if you want to disable submission denied email.
- Subject: Enter the email subject here. You can use the shortcodes [achievement_name] and [user_name] to add the achievement name and user name in the email subject, respectively.
- Content: Enter the email content here. You can use these shortcodes [achievement_name], [user_name], and [achievement_link] to add the achievement name, user name, and achievement link in the email respectively.

In the Submissions tab, you can also configure the following email settings for pending submissions:
- Disable Submission Pending Email: Check this option if you want to disable the pending submission email.
- Subject: Enter the email subject here. You can use the shortcodes [achievement_name] and [user_name] to add the achievement name and user name in the email subject respectively.
- Content: Enter the email content here. You can use the shortcodes [achievement_name], [user_name],[submission_link] and [submission_type_link] to add the achievement name, user name, submission’s link and link of all submission achievements in the email respectively.
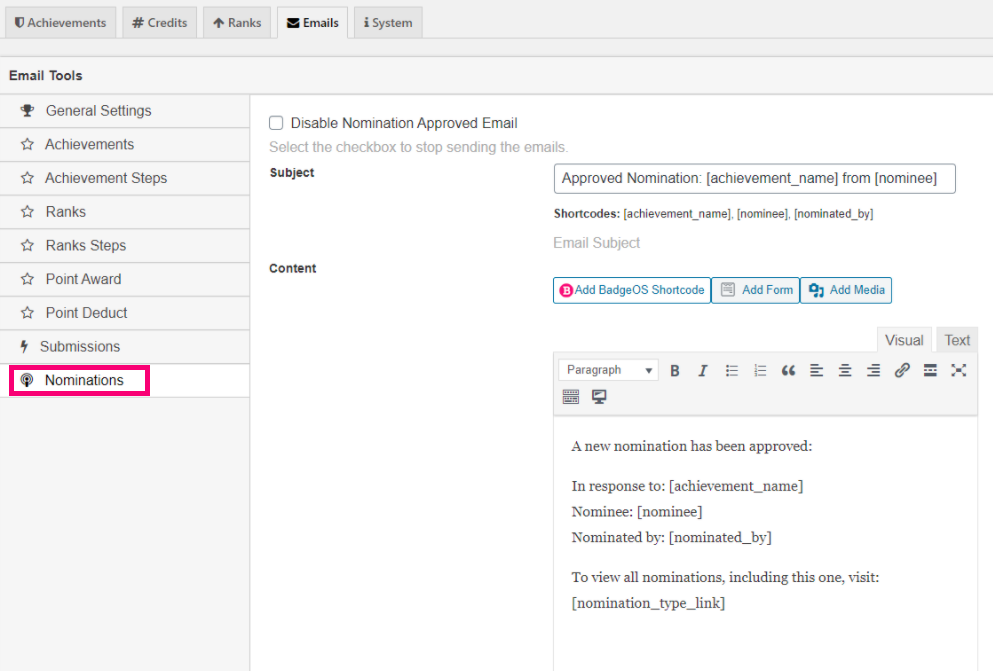
Nominations
In the Nominations tab, you can configure the following setting for approved nominations:
- Disable Nomination Approved Email: Check this option if you want to disable nomination approved email.
- Subject: Enter the email subject here. You can use the shortcodes [achievement_name], [nominee], and [nominated_by] to add the achievement name, nominee’s name, and name of the person nominating in the email subject respectively.
- Content: Enter the email content here. You can use the shortcodes [achievement_name], [user_name], [nominated_by], [nomination_type_link] and [achievement_link] to add the achievement name, user name, name of the person nominating, nomination type link and achievement’s link in the email respectively.
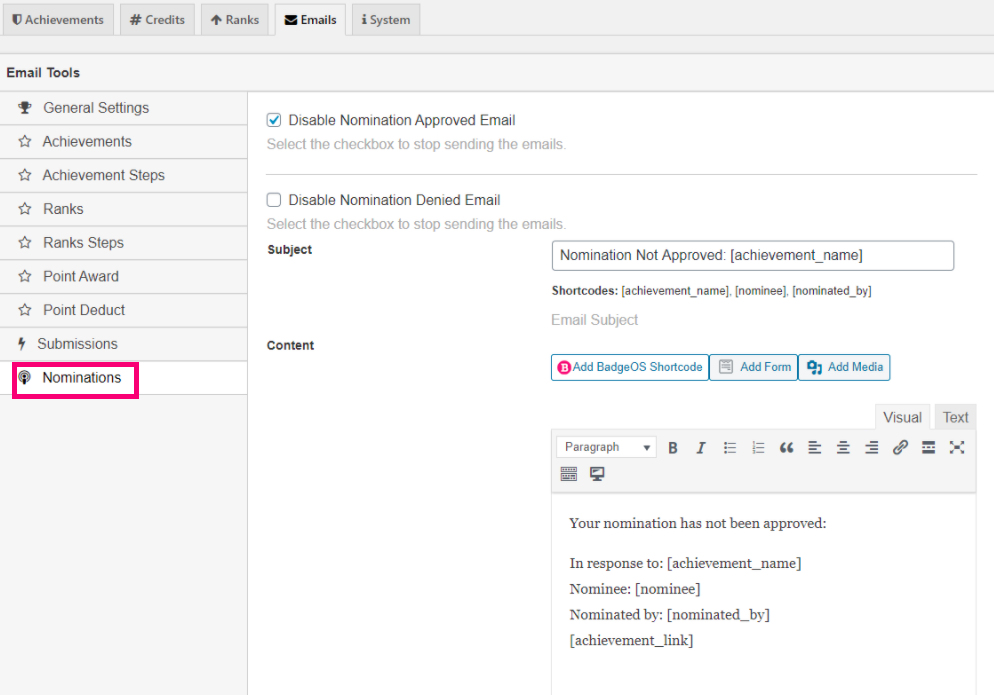
In the Nominations tab, you can configure the following setting for rejected nominations:
- Disable Nomination Denied Email: Check this option if you want to disable nomination denied email.
- Subject: Enter the email subject here. You can use the shortcodes [achievement_name], [nominee], and [nominated_by] to add the achievement name, nominee’s name, and name of the person nominating in the email subject respectively.
- Content: Enter the email content here. You can use the shortcodes [achievement_name], [nominee], [nominated_by], and [achievement_link] to add the achievement name, nominee’s name, name of the person nominating, and achievement’s link in the email respectively.
In the Nominations tab, you can configure the following setting for pending nominations:
- Disable Nomination Pending Email: Check this option, if you want to disable pending nomination email.
- Subject: Enter the email subject here. You can use the shortcodes [achievement_name], [nominee], and [nominated_by] to add achievement name, nominee’s name, and name of the person nominating in the email subject respectively.
- Content: Enter the email content here. You can use the shortcodes [achievement_name], [nominee], [nominated_by], [nomination_link] and [nomination_type_link] to add achievement name, nominee’s name, name of the person nominating,nomination’s link and nomination’s type link in the email respectively.

4. Create An Achievement For Submission
If a user thinks that he is eligible to get a particular badge, he can submit evidence in order to earn that specific badge. To allow users to earn achievements by submission you first need to create an achievement that can be earned through that method.
Get started by creating a new achievement by selecting the desired Achievement type and clicking on Add New. Add a title, description, featured image, and configure any additional achievement data settings according to your needs.
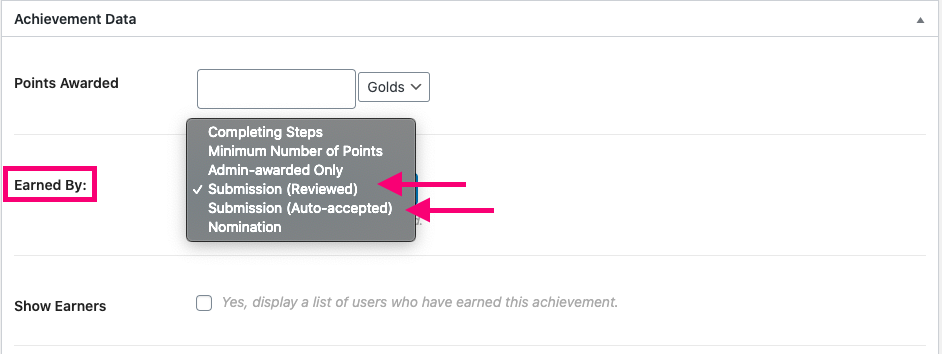
Once you’ve started creating a new achievement, scroll down to the Earned By option, to determine how this achievement can be obtained. There are two Submission options you can select in this field:
- Reviewed Submissions: With this type of submission, you can review a student’s submitted files or content before deciding to accept or reject it.
- Auto-accepted Submissions: Auto accepted submissions are automatically accepted, without the admin’s approval. As a result, the student can earn an achievement by simply completing a submission.
Note: Users can save their submission as a draft by clicking Save Draft and can submit later.
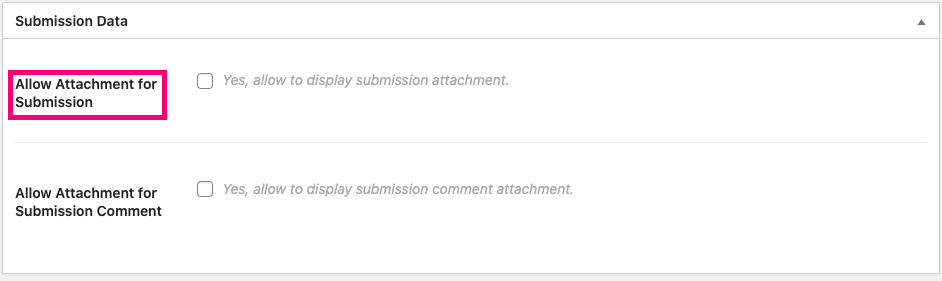
Next, enable the Allow Attachment for Submission option. Attachments are found at BadgeOS > Submission Reviews. The attachment file is located at the end of each submission for review.
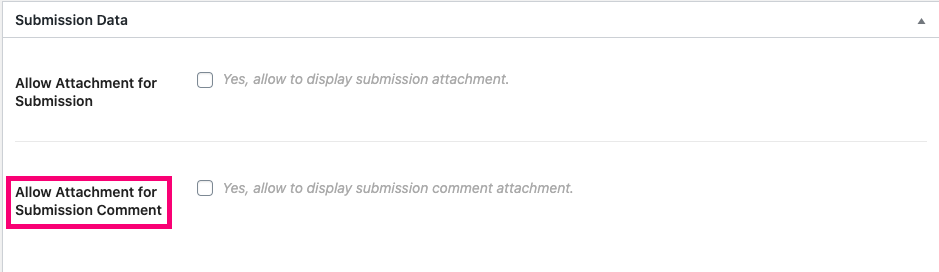
If you want to allow attachments to be included in the Submission Review comments, enable the Allow Attachment for Submission Comment option.
5. Display Submission Forms and Lists
Users submit information and attachments through a submission form that can be added to any page using a shortcode or blocks. To display Submission Forms using shortcode follow these steps:
- Navigate to pages and click on ‘Add new.’
- Click the Add BadgeOS Shortcode button. A pop up will appear.
- Select the Submission Form from the dropdown.
- Select the achievement you want to award for this submission.
- Click Insert Shortcode.
- Publish the page. A text box will appear on the front end where your users can submit the submission and earn a badge.
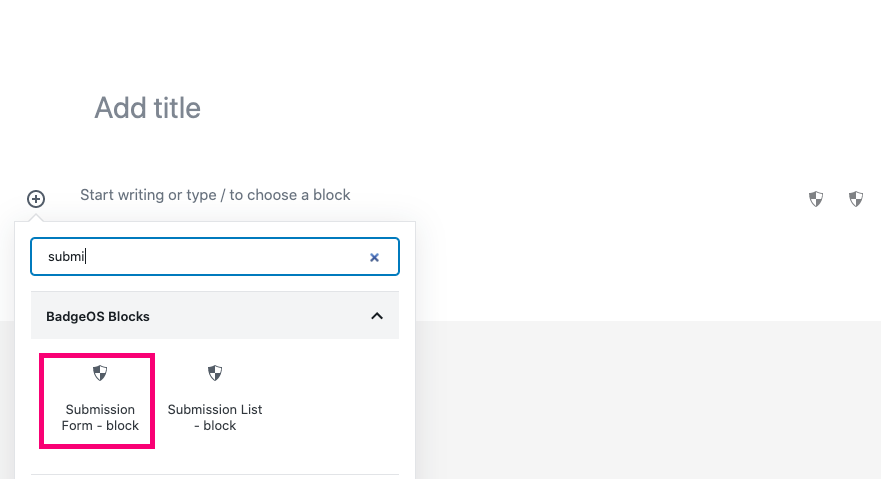
To display Submission Forms using blocks follow these steps:
- Navigate to the desired post/page.
- Click at the “Add Block” icon (+).
- Scroll down to the “BadgeOS Block” or search “BadgeOS.”
- Select the “Submission Form – Block.”
- Set up the Submission Form – Block from the right sidebar.
- Publish
You can also display Submission Lists on any page using shortcodes or blocks. To display a Submission List using shortcode follow these steps:
- Navigate to pages and click on ‘Add new.’
- Click the Add BadgeOS Shortcode button. A pop up will appear.
- Select the Submission List from the dropdown.
- Configure the Submission List options.
- Click Insert Shortcode.
To display a Submission List using blocks follow these steps:
- Navigate to the desired post/page.
- Click at the “Add Block” icon (+).
- Scroll down to the “BadgeOS Block” or search “BadgeOS.”
- Select the “Submission List – Block.”

- Set up the Submission List – Block from the right sidebar.
- Publish
6. Review Submissions
As an admin, you can find all submissions of your users at BadgeOS > Submission Reviews. Here you will find a list of all user submissions ready for review. Upon review, you can determine whether to approve or deny the submission.
From the Submission Details section, you can look at any information the user submitted including attachments, and the submission date. The submission status is also displayed.
The submission status can take any of the following values:
- Pending: The submission still needs to be approved or rejected.
- Approved: The submission is accepted and the achievement is awarded. If necessary this status can later be changed to “rejected”.
- Rejected: The submission is not approved and the achievement isn’t earned.If necessary the status can be changed back to pending again.
7. Create An Achievement For Nomination
If a user/student thinks that another user/student is deserving and eligible for a badge, he can nominate the eligible user/student to get that badge. The nomination requires the admin’s approval before earning.
Get started by creating a new achievement by selecting the desired Achievement type and clicking on Add New.
- Add a title, description, featured image.
- Scroll down to the Earned By option, to determine how this achievement can be obtained. Select “Nomination” from this dropdown.
- Configure any additional achievement options according to your needs
- Publish
8. Display Nomination Forms and Lists
Users can nominate others to receive achievements through a nomination form that can be added to any page using shortcode or blocks. To display Nomination Forms using shortcode follow these steps:
- Navigate to pages and click on ‘Add new.’
- Click the Add BadgeOS Shortcode button. A pop up will appear.
- Select the Nomination Form from the dropdown.
- Select the achievement you want to award for this submission.
- Click Insert Shortcode.
- Publish the page.
To display Nomination Forms using blocks follow these steps:
- Navigate to the desired post/page.
- Click at the “Add Block” icon (+).
- Scroll down to the “BadgeOS Block” or search “BadgeOS.”
- Select the “Nomination Form – Block.”
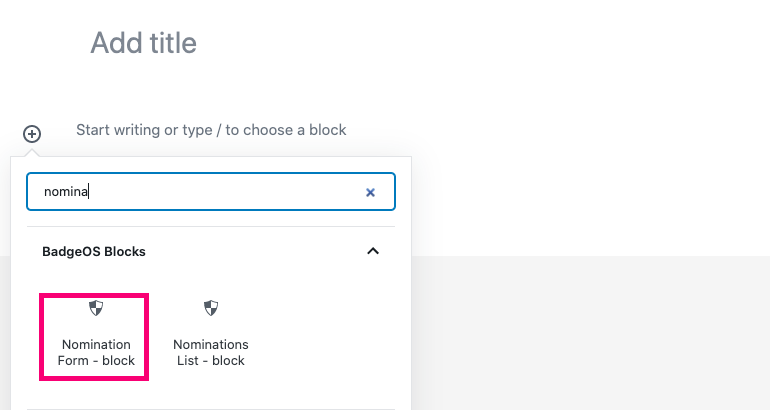
- Set up the Nomination Form – Block from the right sidebar.
- Publish
You can also display Nomination Lists on any page using shortcode or blocks. To display a Submission List using shortcode follow these steps:
- Navigate to pages and click on ‘Add new.’
- Click the Add BadgeOS Shortcode button. A pop up will appear.
- Select the Nomination List from the dropdown.
- Configure the Submission List options.
- Click Insert Shortcode.
To display a Nomination List using blocks follow these steps:
- Navigate to the desired post/page.
- Click at the “Add Block” icon (+).
- Scroll down to the “BadgeOS Block” or search “BadgeOS.”
- Select the “Nomination List – Block.”

- Set up the Nomination List – Block from the right sidebar.
- Publish
9. Review Nominations
As an admin, you can find all submissions of your users at BadgeOS > Submission Reviews. Here you will find a list of all user submissions ready for review. Upon review, you can determine whether to approve or deny the submission.
You will use the Nomination Review field to review the nominations your users have submitted and Approve or Deny them.
In this section, you can also view the Nomination status. The nomination status can take any of the following values:
- Pending: The nomination still needs to be approved or rejected.
- Approved: The nomination is accepted and the achievement is awarded. If necessary this status can later be changed to “rejected”.
- Rejected: The nomination is not approved and the achievement isn’t earned.If necessary the status can be changed back to pending again.
10. Frequently Asked Questions
- Can I change the status of the review after approving or denying it for the first time?
Yes, we can change the status of the review in any number of times after approving or denying for the first time but the achievement awarded won’t be revoked.
- Do the nominations awarded directly without admin approval just like Submission (auto accepted)?
No, the nominations require admin approval before being awarded.
- Does the user nominate the eligible user to get an achievement too?
The user who nominates another user won’t earn the achievement but the user that is being nominated earns this achievement.