Credly Migration
If you are a BadgeOS+Credly user and want to migrate your achievements and other related data to your BadgeOS only site then please follow the following steps:
OB (Open Badge) Integration
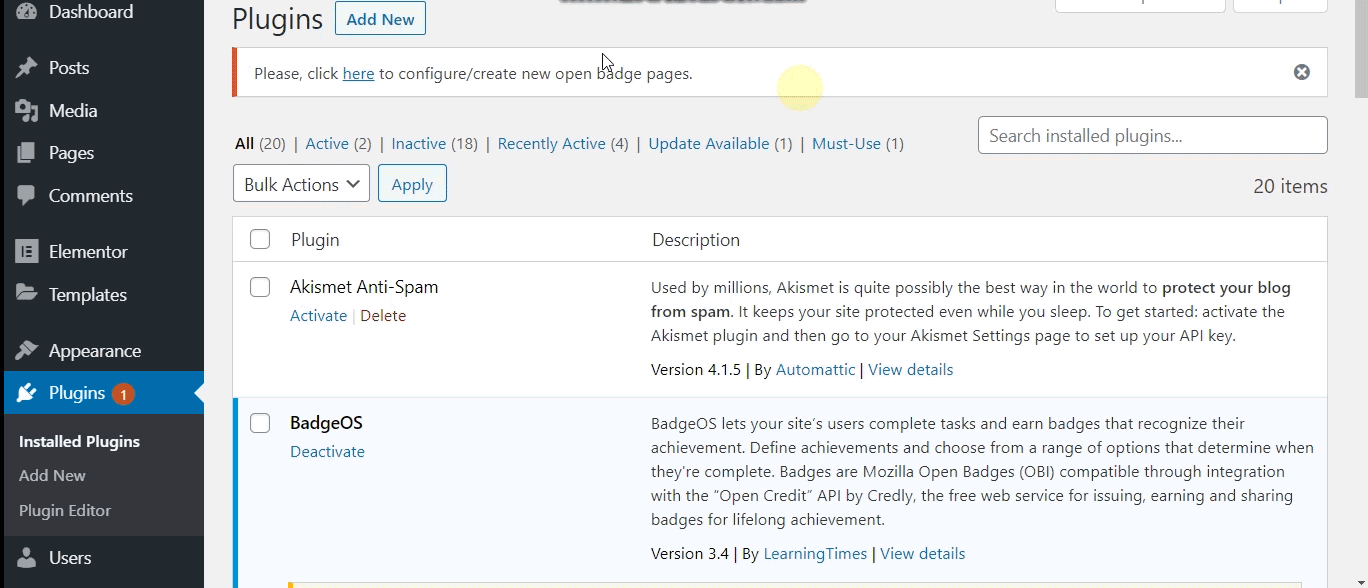
- Once you update to BadgeOS 3.6, you will notice a new option in your back-end named ‘Open Badges’ and a notice will appear on your “Installed Plugins” page.

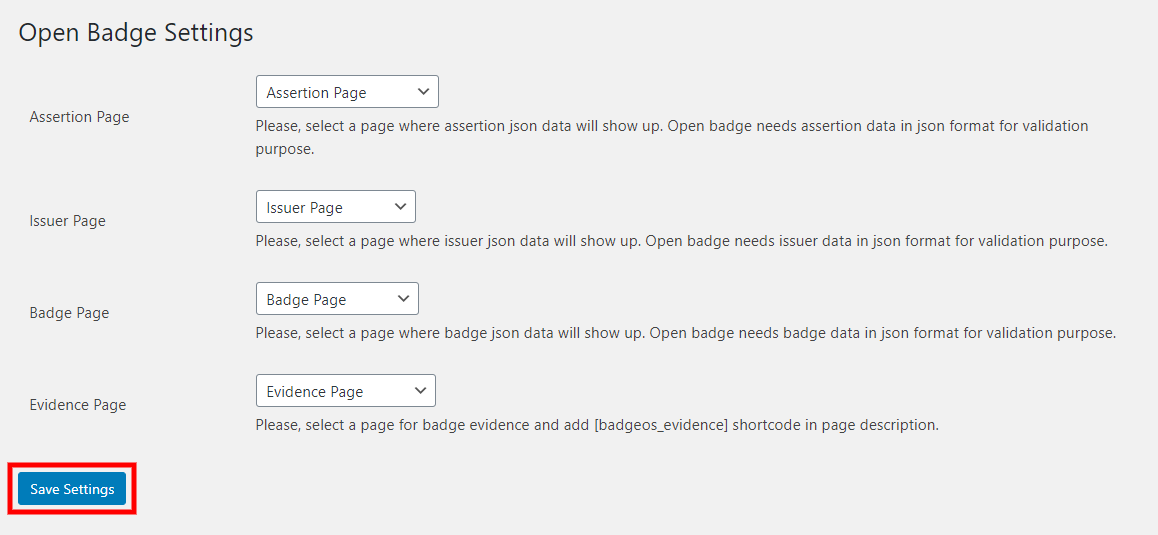
- Click the link to create/configure the necessary pages. Once you click, it will redirect you to the “Open Badge Settings page” and automatically create the four necessary pages named Assertion Page, Issuer Page, Badge Page, and Evidence Page.
- These four pages will help BadgeOS to bake and to store all the necessary data regarding the Open Badges. As these pages are essential for the BadgeOS to work correctly, please don’t delete these pages. If you are wondering what are ‘Open badges’, a simple answer can be, a badge which is more than just a pretty picture, that has some verifiable information behind it, is basically an Open Badge Compliant badge. You had this feature with Credly before, it’s only fair that you have this option with BadgeOS as well.
- On the “Open Badge Settings” page just click “Save Settings”.
Migrate Achievement From Credly
- On the “Open Badge Settings” page, scroll down to the “Migrate Credly Achievements” section.
- Check the option “Disable Credly” to stop your users to earn badges/achievements on Credly.
- By checking this option, your users will not be able to earn the badges/achievements on Credly. The good thing is, nothing will be changed for your end-users (badge earner) on their ends except that now they have to log in to your WordPress site to view their earned badges/achievements.
- Click the “Migrate Credly Achievements” button.
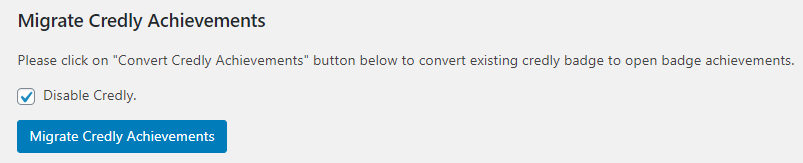
- A progress bar will be shown while migrating the existing BadgeOS badges. It will migrate your existing Credly achievements to the BadgeOS Open Badges and will disable all the Credly options.
How to Display Earned Badges on Your WordPress Site?
To display the earned badges on your WordPress site to the user/earner, please follow these steps:
- Navigate to the desired post/page or add a new page.
- Click on the “Add Block” icon (+).
- Scroll down to the “BadgeOS Block” or search “BadgeOS”.
- Expand the section.
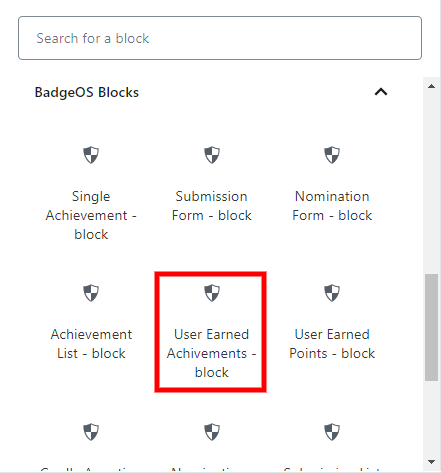
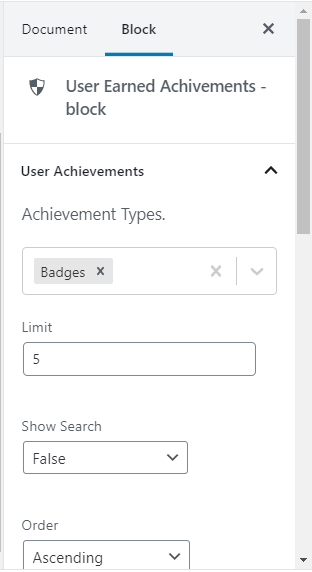
- Select the “User Earned Achievements – Block”.
- Set up the “User Earned Achievements – Block” from the right sidebar.
- Select the desired Achievement Type for the “Achievement Types” option. You can select multiple achievement types.
- Publish/Update.
Add Earned Achievements Page to Menu
You can add this earned achievements page to your site menu so that end-users/earners can view their earned achievements on your WordPress site’s page.
To add this earned achievements page to your site menu, please follow these steps:
- Navigate to the Appearance > Menu from your WP-Dashboard.
- Select your primary menu.
- Search the recently created page from the Pages meta box.
- Check the page and hit the “Add to Menu” button.
- Drag and drop the item to the desired place in the Menu structure section.
- Click the “Save Menu” button.

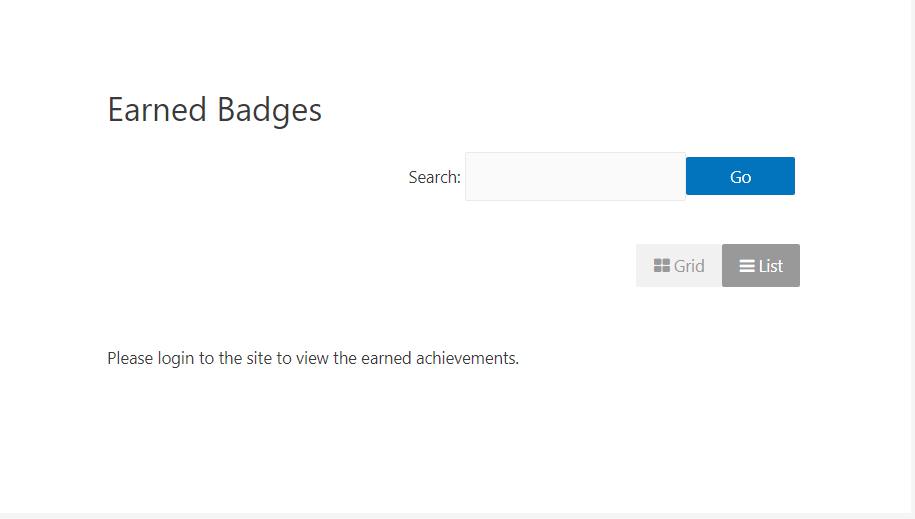
By completing these steps the Earned Achievements page will be added to your site menu, so the end-users/earners can view their earned achievements on this page.
A message “Please login to the site to view the earned achievements” will be shown only if the end-user is not logged in to your WordPress site.
Add User Earned Achievements Widget in the Sidebar
You can also add the BadgeOS Users Earned Achievements widget in your site’s sidebar, where your end-users/earners can view their earned achievements.
To add this ‘user earned achievements’ widget in the sidebar of your site, please follow these steps:
- Navigate to the Appearance > Widgets from your WP-Dashboard.
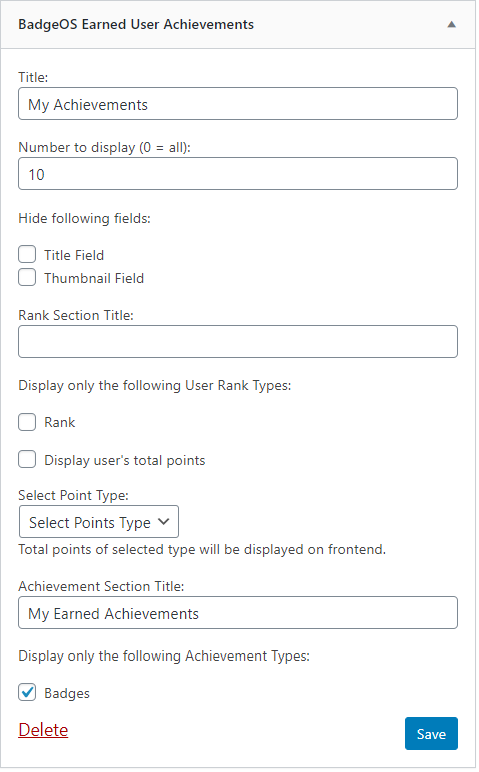
- Search the BadgeOS Earned User Achievements widget under the Available Widgets section.
- Drag and drop it to the desired sidebar.
- Edit Title.
- Add Number to Display. You can add 0 for All.
- Select the desired field to hide it from this part under the Hide following fields option. (If you check the Title Field option it will hide the badge title and if you check the Thumbnail Field option it will hide the badge thumbnail/image from the sidebar)
- Enter Achievement Section Title.
- Select the desired achievement type/s to display in the sidebar from the option Display only the following Achievement Types.
- Click the “Save” button.
Convert All the Earned Badges into OB Standard Badges
- Scroll to the “Convert non-open standard achievements” section.
- Click the “Convert Achievements” button. It will convert all the existing but already earned non-open standard badges/achievements into the open standard badges.
This button will only appear if you have non-open standard achievements awarded to the users.

Deactivate Credly Login Add-on
If you have the “Credly Login for WordPress” add-on activated, you have to deactivate it. So your users can only log into your site by using your WordPress site credentials. To disable the “Credly Login for WordPress” add-on, please follow these steps:
- Navigate to the “Plugins” from your WP Dashboard.
- Search “Credly Login”.
- Click “Deactivate”
“Login with Credly” button will be removed from your login page/form. Your users can easily get their WordPress site’s password by using the “Forget Password” link on your WordPress site’s login page/form.
